You can execute queries that reference tables, views, and synonyms in other databases on the same Netezza server. This means that you can use these references in the SELECT
statement FROM clauses in queries that can include INSERT, DELETE, UPDATE, CREATE
TABLE AS, joins, set operations, aggregations, subselects, view definitions, and so on.
When specifying reference objects, keep in mind the following:
You must specify reference objects that reside on the same Netezza server.
You cannot specify reference objects that are under control of third-party applications.
You cannot specify a cross-reference object in the SELECT portion of a CREATE MATERIALIZED VIEW statement.
Referencing Database Objects
To refer to objects in other databases on the Netezza system, you must use three-level naming, which consists of the following components:
The database — The database or catalog name.
The schema — The schema, which is the name of the database owner. Note that in
Netezza release 3.0, there is only one schema per database.
The object — The name of the object, table, view, or synonym.
Database Object Naming
You specify objects in the FROM clause of SQL statements in the three-level form. You can use the standard form or the shorthand notation.
The database-name.schema.object-name — The three-level or fully qualified form.
The database-name..object-name — A convenient way of specifying a fully qualified
object name. The system supplies the schema name by internally inserting the current
schema name.
The schema.object-name — The two-level form, which you can use only when referring
to the current database.
Cross-Database Usage Examples
In the following examples, the Netezza system has two databases: DEV and PROD. Both
databases have tables named EMP. A client program connected to DEV is able to reference tables in PROD in the FROM clause of SQL queries. This is referred to as a cross-database query.
Note: The following examples use the implicit schema represented by “..” between the
database name and the table or view name.
To retrieve all rows from the table EMP in connected-to database DEV, enter:
dev(admin)=>SELECT * FROM DEV..EMP;
To retrieve all rows from the table EMP in the database PROD, enter:
dev(admin)=>SELECT * FROM PROD..EMP;
To truncate the contents of DEV.EMP.
dev(admin)=>TRUNCATE TABLE EMP;
To insert the contents of PROD..EMP into DEV..EMP.
dev(admin)=>INSERT INTO EMP SELECT * FROM PROD..EMP;
To join tables from both PROD and DEV.
dev(admin)=>SELECT COUNT (*) FROM DEV..EMP DE, PROD..EMP PE WHERE
DE.ID = PE.ID;
To retrieve rows from PROD.EMP, enter:
dev(admin)=>SELECT * FROM PROD..EMP WHERE PROD..EMP.DEPTNO IN (SELECT
DE.DEPTNO FROM DEV..EMP DE WHERE DE.ID < 10);
To create a table from PROD.EMP and DEV.EMP, enter:
dev(admin)=>CREATE TABLE KEYEMPS AS SELECT * FROM PROD..EMP INTERSECT
SELECT * FROM DEV..EMP;
Common Error Messages
Note that you cannot use cross-database INSERT, UPDATE, or DELETE statements. If you
attempt to do so, the system displays an error message.
For example, if you attempt to insert data into a table that does not reside in the current database (the database you are logged in to), the system displays an error message:
dev(admin)=>INSERT INTO PROD..EMP SELECT * FROM EMP;
Cross Database Access not supported for this type of command.
For this type of query, consider changing the query to a cross-database SELECT statement (which is supported) while logged in to the target database. For example:
prod(admin)=>INSERT INTO EMP SELECT * FROM DEV..EMP;
You cannot use CREATE, ALTER, or DROP commands to change objects in a database outside your current database. If you attempt to do so, the system displays an error message.
For example, if you attempt to create an object in a different database, the system displays an error message:
dev(admin)=>CREATE PROD..PAYROLL;
Cross Database Access not supported for this type of command.
Qualified Column Names
When a query involves multiple tables, it is sometimes difficult to know which column
belongs to which table especially if the tables have the same column names. To help distinguish among column names, SQL allows you to fully qualify column names by specifying the column as: database.schema.table.column.
When referring to column names in cross-database access, the system expects the qualified column name to be in the form of exposed-table-reference.column-name; where the exposed-table-reference is any of the acceptable tables references in the FROM clause.
For example, emp, admin.emp, dev.admin.emp and dev..emp are all equivalent forms for
the same table:
FROM emp WHERE dev.admin.emp.id = 10;
FROM dev.admin.emp WHERE emp.id = 10;
FROM emp WHERE admin.emp.id = 10;
FROM emp WHERE dev.admin.emp.id = 10;
FROM dev..emp WHERE admin.id = 10;
Table and Column Aliases
Aliases are like synonyms in that they are alternate names for tables or columns. Aliases differ from synonyms in that they exist only for the duration of the query.
Aliases can be single letters or words, but when using aliases in cross-database access, the system expects the column name to be in the form of the alias.column-name.
For example, the following are correct notations, where E is the alias:
dev(admin)=>FROM emp E WHERE E.id =10
dev(admin)=>FROM admin.emp E WHERE E.id =10
Using Synonyms
You can create SQL synonyms as an alternate way of referencing tables or views that reside in the current or other databases on the Netezza system. Synonyms allow you to create easily typed names for long table or view names. They also allow you to create a level of abstraction for the database objects and thereby enable you to swap the underlying objects without affecting the code that references these objects.
Synonyms share the same naming restrictions as tables and views, that is, they must be unique within a database and their names cannot be the same as global objects such as those of databases, users, or groups.
You can use the following synonym commands:
CREATE SYNONYM — To create a synonym
DROP SYNONYM — To drop/delete a synonym
ALTER SYNONYM — To rename or change the owner of a synonym
GRANT SYNONYM — To grant permission to create, alter, or drop a synonym to a user
or group
REVOKE SYNONYM — To revoke permission to create, alter, or drop a synonym to a
user or group
Managing Databases
Using SQL commands, you can create, drop, rename, or change the owner of databases.
Creating a Database
To create a database, use the CREATE DATABASE command.
system(admin)=> CREATE DATABASE mydb;
CREATE DATABASE
If you do not have the privileges required to create a database, the system displays the following message:
ERROR: CREATE DATABASE: permission denied.
Database names can have a maximum length of 128 bytes, otherwise the system displays
an error message. Database names must be valid identifier names.
Dropping a Database
If you are logged in as the admin user or the owner of a database, you can drop the database using the DROP DATABASE command. Dropping the database removes the entries for an existing database and deletes the directory that contains the data. For example:
system(admin)=> DROP DATABASE mydb;
DROP DATABASE
Renaming a Database
If you are logged in as the admin user or the owner of a database, you can rename the database using the ALTER DATABASE command. The data remains of the same type and size. For example:
system(admin)=> ALTER DATABASE mydb RENAME TO newdb;
ALTER DATABASE
Note: After you rename a database, recompile any views that are associated with that database. Any materialized views in the database will be converted to regular (non-materialized) views.
Changing Database Ownership
If you are logged in as the admin user or the owner of a database, you can change the
owner using the ALTER DATABASE command. The new owner must be a current user of the
system. For example:
system(admin)=> ALTER DATABASE mydb OWNER TO jane;
ALTER DATABASE
Specifying International Character Sets You can use Netezza SQL to specify international characters based on the syntax extensions to SQL:1999, which use Unicode and ISO standards. Using these extensions, you can specify Latin and other international characters sets, including Kanji.
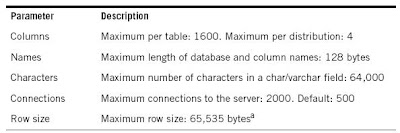
Understanding Database Maximums
Handling SQL Identifiers
A SQL identifier is the name of a database object such as a table, column, user, group, user-defined object, and database. Netezza supports the SQL 1999 definition for naming identifiers, and they can be up to 128 bytes in length. There are two types of identifiers — regular and delimited.
Note: Account passwords, the names of files, and other values are not identifiers, and thus may support a reduced set of characters, including only 7-bit ASCII characters. The file names for external tables must be in UTF-8.
A regular identifier is not case sensitive; that is, if you create a database named SALES, you can refer to it using any case combination of letters. For example, SALES, sales, SaLeS, and SALEs all match the database named SALES. The ANSI SQL standard specifies that systems should convert all regular SQL identifiers to the corresponding upper-case characters, so the Netezza system converts any regular identifier you specify into uppercase characters when it is saved in the database, and also when the regular identifiers are used in query processing.
Regular identifiers can contain only letters (in any alphabet, not just the Latin alphabet), syllables (as in the Japanese Hiragana syllabary), ideographs, decimal digits, underscores, and dollar sign ($). Regular identifiers must begin with a letter; they cannot begin with a digit, underscore, or dollar sign. Regular identifiers also cannot be a SQL reserved word (as described in Appendix A, “SQL Reserved Words and Keywords”). The encoding in the Netezza catalog is in UTF-8; the encoding for any display will depend on the client. A delimited identifier is also a name of a database object, but it is enclosed in double-quotation
marks and has special considerations.
A delimited identifier is case-sensitive, so a database named “Sales” is not the same database as one named SALES, for example. The Netezza system does not convert delimited identifiers to the default system case, nor does it save the enclosing double-quotation marks in the database. Within the double quotation marks, a delimited identifier can include the same letters, syllables, ideographs, decimal digits, and underscores as a regular identifier, but it can also include spaces, special characters such as hyphens and percent signs, and SQL reserved keywords. A delimited identifier can begin with any of these letters, digits, or symbols.
For example, the following query uses delimited identifiers for both column and table
names:
SELECT "My Field" FROM "My Table" WHERE "My Field" LIKE 'A%'
Note that the string literal 'A%' is enclosed in single quotes.
You can change the system default lettercase behavior at system initialization by using the nzinitsystem -lowercase command.
Creating a Database
To create a database, use the CREATE DATABASE command.
system(admin)=> CREATE DATABASE mydb;
CREATE DATABASE
If you do not have the privileges required to create a database, the system displays the following message:
ERROR: CREATE DATABASE: permission denied.
Database names can have a maximum length of 128 bytes, otherwise the system displays
an error message. Database names must be valid identifier names.
Dropping a Database
If you are logged in as the admin user or the owner of a database, you can drop the database using the DROP DATABASE command. Dropping the database removes the entries for an existing database and deletes the directory that contains the data. For example:
system(admin)=> DROP DATABASE mydb;
DROP DATABASE
Renaming a Database
If you are logged in as the admin user or the owner of a database, you can rename the database using the ALTER DATABASE command. The data remains of the same type and size. For example:
system(admin)=> ALTER DATABASE mydb RENAME TO newdb;
ALTER DATABASE
Note: After you rename a database, recompile any views that are associated with that database. Any materialized views in the database will be converted to regular (non-materialized) views.
Changing Database Ownership
If you are logged in as the admin user or the owner of a database, you can change the
owner using the ALTER DATABASE command. The new owner must be a current user of the
system. For example:
system(admin)=> ALTER DATABASE mydb OWNER TO jane;
ALTER DATABASE
Specifying International Character Sets You can use Netezza SQL to specify international characters based on the syntax extensions to SQL:1999, which use Unicode and ISO standards. Using these extensions, you can specify Latin and other international characters sets, including Kanji.
Understanding Database Maximums

Handling SQL Identifiers
A SQL identifier is the name of a database object such as a table, column, user, group, user-defined object, and database. Netezza supports the SQL 1999 definition for naming identifiers, and they can be up to 128 bytes in length. There are two types of identifiers — regular and delimited.
Note: Account passwords, the names of files, and other values are not identifiers, and thus may support a reduced set of characters, including only 7-bit ASCII characters. The file names for external tables must be in UTF-8.
A regular identifier is not case sensitive; that is, if you create a database named SALES, you can refer to it using any case combination of letters. For example, SALES, sales, SaLeS, and SALEs all match the database named SALES. The ANSI SQL standard specifies that systems should convert all regular SQL identifiers to the corresponding upper-case characters, so the Netezza system converts any regular identifier you specify into uppercase characters when it is saved in the database, and also when the regular identifiers are used in query processing.
Regular identifiers can contain only letters (in any alphabet, not just the Latin alphabet), syllables (as in the Japanese Hiragana syllabary), ideographs, decimal digits, underscores, and dollar sign ($). Regular identifiers must begin with a letter; they cannot begin with a digit, underscore, or dollar sign. Regular identifiers also cannot be a SQL reserved word (as described in Appendix A, “SQL Reserved Words and Keywords”). The encoding in the Netezza catalog is in UTF-8; the encoding for any display will depend on the client. A delimited identifier is also a name of a database object, but it is enclosed in double-quotation
marks and has special considerations.
A delimited identifier is case-sensitive, so a database named “Sales” is not the same database as one named SALES, for example. The Netezza system does not convert delimited identifiers to the default system case, nor does it save the enclosing double-quotation marks in the database. Within the double quotation marks, a delimited identifier can include the same letters, syllables, ideographs, decimal digits, and underscores as a regular identifier, but it can also include spaces, special characters such as hyphens and percent signs, and SQL reserved keywords. A delimited identifier can begin with any of these letters, digits, or symbols.
For example, the following query uses delimited identifiers for both column and table
names:
SELECT "My Field" FROM "My Table" WHERE "My Field" LIKE 'A%'
Note that the string literal 'A%' is enclosed in single quotes.
You can change the system default lettercase behavior at system initialization by using the nzinitsystem -lowercase command.
Using nzsql Commands
The nzsql command provides many command line options.
Using Command Inputs
Using the nzsql command, you can specify different input options:
�� To run a single query from the command line, enter:
nzsql -c "select * from test_table"
�� To read input from the current source, for example a script, enter:
nzsql
<
eof
�� To read input (standard in), enter:
nzsql < foo.sql
�� To execute queries from a file (command line argument), enter:
nzsql -f foo.sql
�� To execute queries from a file (nzsql option), enter:
nzsql
\i foo.sql
Using Command Outputs
Using the nzsql command, you can specify different output options:
�� To save the resulting count value into a variable for later use, enter:
VAR1=‘nzsql -A -t -c "select count(*) from test_table"‘
�� To pipe the output to a printer, enter:
nzsql | lpr
�� To send the output to a file (command line argument), enter:
nzsql -o foo.out
�� To send the output to a file (nzsql option), enter:
nzsql
\o foo.out
Note: The nzsql command pipes interactive output (to a screen) through the more command so it can be paginated and scrolled for viewing. To change to another command, set the PAGER environment variable. For example, export PAGER=cat.
Using the nzsql Command Line Options
When you type nzsql -h, the system displays the command line options that you can use. For a list and descriptions of the all the command line options, see Table D-1 on page D-1. The following describes some useful command line options:
�� -A — Unaligned table output mode
Normally output is well formatted with white space added so that columns align. If you use the -A option, the nzsql command removes extra white space. Use this command
when you want to compare results between two systems or when you want to transfer
data.
�� -c — Run a single query and exit
This option lets you run a single query. When you combine it with options -A, and -t
(print rows only) you can create useful scripts. For example, to find out the number of records in a table, enter:
#!/bin/bash
export CNT=‘nzsql -A -t -c "select count (*) from $1"‘
echo "The number of records in table $1 is $CNT"
�� -E — Display queries that internal commands generate
This option lets you see how the SQL is being generated. For example, \l displays the
list of databases and when you add -E to the command line, the system shows you the
actual SQL used to generate the list.
nzsql -E
\l
********* QUERY *********
SELECT Database, Owner FROM _v_database
*************************
List of databases
database | owner
--------------+-------
database_one | admin
database_two | admin
system | admin
(3 rows)
�� -f — Execute queries from a file
�� -F — Set the field separator
The default delimiter between output columns is a pipe (|) symbol. When used with the
-A option (unaligned output), you can specify a different delimiter string, such as a
space, tab, comma, colon, and so on. Note that you can use the -R to change
the record separator. The default is newline.
�� -H — HTML Table Output Mode
You can format the nzsql output to use HTML tags.
�� -t — Print rows only
Normally the nzsql command includes column headings and a summary row for all SQL
queries. Use the -t option to eliminate the column headings and summary row. Use this
option with the -A option to produce data in a transportable format.
�� -x — Expand table output
You can use this option to display the query results vertically instead of in the default table/2D grid.
Using Miscellaneous Command Options
The nzsql command has the following command line options that you use when running
queries:
�� -- — Two dashes denote the beginning of a single-line comment.
�� /* — Forward slash and an asterisk denote the beginning of a multiline comment.
�� ‘literal’ — Use single quotes around literals. For example, ‘May 10, 2000’, ‘Netezza’. ‘US’. Use a pair of single quotes when you want to embed a single quote. For example, ‘Mark''s Test'.
�� ”label” — Use double quotes around labels. For example, SELECT lst_name AS
"Employee Last Name" FROM emp_table;
�� Identifiers — The system automatically converts identifiers, such as database, table, and column names, to the default system case, which is Upper on new systems. If you want to use mixed case and/or spaces, you must use double quotes around the identifier. For example, CREATE TABLE "Emp Table" (emp_id integer, emp_name char(20));
SELECT emp_id FROM "Emp Table";
�� */ — Asterisk and forward slash denote the end of a multiline comment.
Using the nzsql Internal Slash Options
When you use the nzsql command in interactive mode, there are many options that you can use. These options, known as internal slash options, are called with a backslash (\) . Many of these options are the same as those available on the command line.
The following are some useful internal slash options. For a list and description of all the internal slash options, see Table D-2 on page D-2.
�� \d — Describe a table or view.
Displays the DDL for a specific table.
�� \dt and \dv — List tables or views.
Lists the tables or views in the current database.
�� \dSt and \dSv — List system tables or views.
Lists the Netezza internal tables or views if you are the admin user. If you are another user, you must have the appropriate privileges. Note that internal tables begin with _t_ and internal views begin with _v_.
Note: Do not modify these tables. Doing so could impact the integrity of your system.
�� \du and \dU — List users and users’ groups.
Displays a list of all users or a list of users and the groups in which they are members.
�� \dg and \dG — List groups and groups of users.
Displays a list of all groups or a list of all the groups and their members.
�� \dGr — List resource sharing groups.
Displays a list of the groups that are assigned to Guaranteed Resource Allocation
(GRA).
�� \echo — Write text to standard output.
Allows you to include descriptive text between SQL statements. This is especially useful when writing scripts, as in the following example:
nzsql <
SELECT COUNT(*) FROM customer;
\echo Rowcount after the truncate
TRUNCATE TABLE customer;
SELECT COUNT(*) FROM customer;
eof
When you run this script, the system displays the messages “Rowcount before (or after) the truncate count” before the two select statements.
�� \h [cmd] — Display help on SQL syntax.
Use this option to display help for SQL syntax for a specific command. The help displays a description of the command and the command syntax. ”
�� \l — List all databases.
Use this option to list all the databases and their owners.
�� \![cmd] — Issue shell command.
Use this option to run a shell command without terminating your nzsql session. You
can use this option to issue shell commands between SQL statements, which is especially useful in scripts.
nzsql <
SELECT COUNT(*) From customer;
\! date
eof
The example produces the following output:
Wed Jun 27 11:23:50 EDT 2007
count
-------
12399
(1 row)
Wed Jun 27 11:23:50 EDT 2007
You can use the \set command to store an often-used expression or SQL statement in a
variable. This variable is visible for the length of your connected session.
a. Set the variable:
\set my_sql 'select * from sales_tbl where amt > '
b. Use the variable in a query:
:my_sql 4000;
city | state | region | quarter | amt
------------+-------+------------+---------+------
New York | NY | Northeast | 3 | 4300
New York | NY | Northeast | 4 | 5000
Using the Query Buffer
Because the nzsql command is line oriented, it is difficult to edit a complex, multiline SQL statement. To make it easier, use the query buffer.
�� \e — Edit the current query buffer or file with an external editor.
When you exit the editor, the system automatically runs your query. Note that the query buffer stores only the last SQL statement.
The default editor is vi. To change to another editor, set the EDITOR environment variable.
For example, export EDITOR=emacs.
�� \p — Show the contents of the query buffer.
�� \r — Reset (clear) the query buffer.
�� \w — Write the query buffer to a file.
nzsql Exit Codes
The nzsql command returns one of the following error codes:
�� 0 — Success on the last statement executed (SQL or "\" commands, including "\q").
�� 1 — Any type of failure (syntax error, database problems, and so on) on the last statement executed.
�� 2 — Any type of connection failure (bad database name, wrong user/password, database down, and so on).
�� 3 — The user cancelled a query by pressing Control-C.
When executing commands from a file (with the -f command line option) the nzsql command normally executes all statements. To have the nzsql command stop execution and exit if it encounters an error, use ‘-v ON_ERROR_STOP=1’ on the command line.
Using Command Inputs
Using the nzsql command, you can specify different input options:
�� To run a single query from the command line, enter:
nzsql -c "select * from test_table"
�� To read input from the current source, for example a script, enter:
nzsql
<
eof
�� To read input (standard in), enter:
nzsql < foo.sql
�� To execute queries from a file (command line argument), enter:
nzsql -f foo.sql
�� To execute queries from a file (nzsql option), enter:
nzsql
\i foo.sql
Using Command Outputs
Using the nzsql command, you can specify different output options:
�� To save the resulting count value into a variable for later use, enter:
VAR1=‘nzsql -A -t -c "select count(*) from test_table"‘
�� To pipe the output to a printer, enter:
nzsql | lpr
�� To send the output to a file (command line argument), enter:
nzsql -o foo.out
�� To send the output to a file (nzsql option), enter:
nzsql
\o foo.out
Note: The nzsql command pipes interactive output (to a screen) through the more command so it can be paginated and scrolled for viewing. To change to another command, set the PAGER environment variable. For example, export PAGER=cat.
Using the nzsql Command Line Options
When you type nzsql -h, the system displays the command line options that you can use. For a list and descriptions of the all the command line options, see Table D-1 on page D-1. The following describes some useful command line options:
�� -A — Unaligned table output mode
Normally output is well formatted with white space added so that columns align. If you use the -A option, the nzsql command removes extra white space. Use this command
when you want to compare results between two systems or when you want to transfer
data.
�� -c — Run a single query and exit
This option lets you run a single query. When you combine it with options -A, and -t
(print rows only) you can create useful scripts. For example, to find out the number of records in a table, enter:
#!/bin/bash
export CNT=‘nzsql -A -t -c "select count (*) from $1"‘
echo "The number of records in table $1 is $CNT"
�� -E — Display queries that internal commands generate
This option lets you see how the SQL is being generated. For example, \l displays the
list of databases and when you add -E to the command line, the system shows you the
actual SQL used to generate the list.
nzsql -E
\l
********* QUERY *********
SELECT Database, Owner FROM _v_database
*************************
List of databases
database | owner
--------------+-------
database_one | admin
database_two | admin
system | admin
(3 rows)
�� -f — Execute queries from a file
�� -F — Set the field separator
The default delimiter between output columns is a pipe (|) symbol. When used with the
-A option (unaligned output), you can specify a different delimiter string, such as a
space, tab, comma, colon, and so on. Note that you can use the -R
the record separator. The default is newline.
�� -H — HTML Table Output Mode
You can format the nzsql output to use HTML tags.
�� -t — Print rows only
Normally the nzsql command includes column headings and a summary row for all SQL
queries. Use the -t option to eliminate the column headings and summary row. Use this
option with the -A option to produce data in a transportable format.
�� -x — Expand table output
You can use this option to display the query results vertically instead of in the default table/2D grid.
Using Miscellaneous Command Options
The nzsql command has the following command line options that you use when running
queries:
�� -- — Two dashes denote the beginning of a single-line comment.
�� /* — Forward slash and an asterisk denote the beginning of a multiline comment.
�� ‘literal’ — Use single quotes around literals. For example, ‘May 10, 2000’, ‘Netezza’. ‘US’. Use a pair of single quotes when you want to embed a single quote. For example, ‘Mark''s Test'.
�� ”label” — Use double quotes around labels. For example, SELECT lst_name AS
"Employee Last Name" FROM emp_table;
�� Identifiers — The system automatically converts identifiers, such as database, table, and column names, to the default system case, which is Upper on new systems. If you want to use mixed case and/or spaces, you must use double quotes around the identifier. For example, CREATE TABLE "Emp Table" (emp_id integer, emp_name char(20));
SELECT emp_id FROM "Emp Table";
�� */ — Asterisk and forward slash denote the end of a multiline comment.
Using the nzsql Internal Slash Options
When you use the nzsql command in interactive mode, there are many options that you can use. These options, known as internal slash options, are called with a backslash (\) . Many of these options are the same as those available on the command line.
The following are some useful internal slash options. For a list and description of all the internal slash options, see Table D-2 on page D-2.
�� \d — Describe a table or view.
Displays the DDL for a specific table.
�� \dt and \dv — List tables or views.
Lists the tables or views in the current database.
�� \dSt and \dSv — List system tables or views.
Lists the Netezza internal tables or views if you are the admin user. If you are another user, you must have the appropriate privileges. Note that internal tables begin with _t_ and internal views begin with _v_.
Note: Do not modify these tables. Doing so could impact the integrity of your system.
�� \du and \dU — List users and users’ groups.
Displays a list of all users or a list of users and the groups in which they are members.
�� \dg and \dG — List groups and groups of users.
Displays a list of all groups or a list of all the groups and their members.
�� \dGr — List resource sharing groups.
Displays a list of the groups that are assigned to Guaranteed Resource Allocation
(GRA).
�� \echo
Allows you to include descriptive text between SQL statements. This is especially useful when writing scripts, as in the following example:
nzsql <
SELECT COUNT(*) FROM customer;
\echo Rowcount after the truncate
TRUNCATE TABLE customer;
SELECT COUNT(*) FROM customer;
eof
When you run this script, the system displays the messages “Rowcount before (or after) the truncate count” before the two select statements.
�� \h [cmd] — Display help on SQL syntax.
Use this option to display help for SQL syntax for a specific command. The help displays a description of the command and the command syntax. ”
�� \l — List all databases.
Use this option to list all the databases and their owners.
�� \![cmd] — Issue shell command.
Use this option to run a shell command without terminating your nzsql session. You
can use this option to issue shell commands between SQL statements, which is especially useful in scripts.
nzsql <
SELECT COUNT(*) From customer;
\! date
eof
The example produces the following output:
Wed Jun 27 11:23:50 EDT 2007
count
-------
12399
(1 row)
Wed Jun 27 11:23:50 EDT 2007
You can use the \set command to store an often-used expression or SQL statement in a
variable. This variable is visible for the length of your connected session.
a. Set the variable:
\set my_sql 'select * from sales_tbl where amt > '
b. Use the variable in a query:
:my_sql 4000;
city | state | region | quarter | amt
------------+-------+------------+---------+------
New York | NY | Northeast | 3 | 4300
New York | NY | Northeast | 4 | 5000
Using the Query Buffer
Because the nzsql command is line oriented, it is difficult to edit a complex, multiline SQL statement. To make it easier, use the query buffer.
�� \e — Edit the current query buffer or file with an external editor.
When you exit the editor, the system automatically runs your query. Note that the query buffer stores only the last SQL statement.
The default editor is vi. To change to another editor, set the EDITOR environment variable.
For example, export EDITOR=emacs.
�� \p — Show the contents of the query buffer.
�� \r — Reset (clear) the query buffer.
�� \w
nzsql Exit Codes
The nzsql command returns one of the following error codes:
�� 0 — Success on the last statement executed (SQL or "\" commands, including "\q").
�� 1 — Any type of failure (syntax error, database problems, and so on) on the last statement executed.
�� 2 — Any type of connection failure (bad database name, wrong user/password, database down, and so on).
�� 3 — The user cancelled a query by pressing Control-C.
When executing commands from a file (with the -f command line option) the nzsql command normally executes all statements. To have the nzsql command stop execution and exit if it encounters an error, use ‘-v ON_ERROR_STOP=1’ on the command line.
Accessing Netezza SQL Using nzsql
You can use the nzsql command on the Netezza system or from a UNIX client system that
can access the Netezza host. The command uses a client/server model, which includes:
�� A server that manages database files, accepts connections to the database from client
applications, and performs actions on the database on behalf of the client.
�� A client application that can perform a variety of database operations. The client could be one of many tools, and is often created by the user.
Logging On
When you invoke the nzsql command, you must supply a database account user name,
password, and the name of the database to which you are connecting. You can enter this information on the nzsql command line, or you can specify the information in environment variables before you begin your nzsql session. For example, you can enter the following from a command window prompt:
nzsql -d sales -u mlee -pw blue
Welcome to nzsql, the Netezza SQL interactive terminal.
Type: \h for help with SQL commands
\? for help on internal slash commands
\g or terminate with semicolon to execute query
\q to quit
SALES(MLEE)=>
Or, you can set the variables in your command shell using variables such as the following, and then use the nzsql command without any arguments:
export NZ_USER=john
export NZ_PASSWORD=red
export NZ_DATABASE=sales
nzsql
Welcome to nzsql, the Netezza SQL interactive terminal.
Type: \h for help with SQL commands
\? for help on internal slash commands
\g or terminate with semicolon to execute query
\q to quit
SALES(JOHN)=>
Note: Throughout the remainder of this guide, the nzsql command output will be abbreviated to omit the “welcome” text for brevity in the examples.
The Netezza administrator creates and manages the database user accounts using SQL
commands or the Netezza NzAdmin and Web Admin administration interfaces. For a complete description of how to manage user accounts, see the Netezza System Administrator’s Guide.
The Netezza system has a default “admin” database user account who is the superuser of the Netezza databases. The admin user can connect to any database; load data; create, alter and drop any objects; create and manage new database users; and so on. Typically the admin user creates new accounts so that other users can access one or more databases and run queries. The admin user can also create accounts with administrative permissions so that other users can be allowed to perform tasks such as manage databases and user setup, backups, and other administrative tasks.
Session Management
Each client user who connects to the Netezza system opens a session. Users can view information about their sessions, as well as manage them to do such tasks as alter or drop their sessions. The admin account or any permitted user can also show, drop, and manage sessions (that is, change the priority and/or rollback a transaction) for a session. For a description of the SQL commands to manage sessions (ALTER SESSION, DROP SESSION, and SHOW SESSION)
SSL Support for Clients
Starting in Release 4.5, the Netezza system supports secure sockets layer (SSL) encryption and authentication for connections to the Netezza system. When you run the nzsql command, you can use the following two options to specify the security options for the connection:
�� -securityLevel specifies the security level that you want to use for the session. The argument has four values:
�� preferredUnsecured — This is the default value. Specify this option when you
would prefer an unsecured connection, but you will accept a secured connection if
the Netezza system requires one.
�� preferredSecured — Specify this option when you want a secured connection to
the Netezza system, but you will accept an unsecured connection if the Netezza
system is configured to use only unsecured connections.
�� onlyUnsecured — Specify this option when you want an unsecured connection to
the Netezza system. If the Netezza system requires a secured connection, the connection will be rejected.
�� onlySecured — Specify this option when you want a secured connection to the
Netezza system. If the Netezza system accepts only unsecured connections, or if
you are attempting to connect to a Netezza system that is running a release prior to
4.5, the connection will be rejected.
�� -caCertFile specifies the pathname of the root certification authority (CA) file. The CA file must be obtained from the Netezza system administrator and installed on the client system. The CA file authenticates the server (the Netezza host) to the client. The default value is NULL, which indicates that no peer authentication will occur.
When you invoke the nzsql command, you can specify these arguments on the command
line or you can specify the information in environment variables before you begin your nzsql session. The environment variables follow:
�� export NZ_SECURITY_LEVEL=level
�� export NZ_CA_CERT_FILE=pathname
These SSL security arguments are also used with the nzsql \c switch when a user attempts to connect to a different Netezza database. If you do not specify values for these fields, the Netezza system uses the values specified for the existing connection.

Understanding the nzsql Prompt
After you invoke the nzsql command, the prompt contains the name of the database and
your user name. In the following example, the database is system and the user is admin:
SYSTEM(ADMIN)=>
By default, the Netezza system uses uppercase letters to display SQL output. The system case can be configured to use lowercase instead, which was the default in earlier Netezza releases.
To connect to another database without exiting the nzsql command, use the \c option:
\c[onnect] [dbname [user] [password]]
For example, the follow command connects to the database named sales as the user mlee
with the password blue:
SYSTEM(ADMIN)=> \c sales mlee blue
You are now connected to database sales as user mlee.
SALES(MLEE)=>
Getting Command Feedback
When you issue a Netezza SQL command, you either succeed or receive an error. In either case, the system provides feedback that you can use in a script.
The system feedback for inserts, updates, and deletes shows you the number of rows acted upon. The feedback for inserts includes an extra zero before the actual number (due to a historical artifact). Samply commands (shown in bold) and the command feedback follows:
nzsql
CREATE TABLE test1 (col1 INTEGER, col2 INTEGER, col3 CHARACTER(40));
CREATE TABLE
INSERT INTO test1 VALUES (100, 200, 'This is a test');
INSERT 0 1
INSERT INTO test1 VALUES (101, 201, 'Another test');
INSERT 0 1
UPDATE test1 SET col2 = 999 WHERE col1 < 1000;
UPDATE 2
INSERT INTO test1 SELECT * FROM test1;
INSERT 0 2
delete from test1 where col1 > 0;
DELETE 4
TRUNCATE TABLE test1;
TRUNCATE TABLE
DROP TABLE test1;
DROP TABLE
Displaying SQL User Session Variables
You can display the current user-defined session variables using the \set command with no arguments. For example:
SALES(MLEE)=> \set
VERSION = 'Netezza SQL Version 1.1'
PROMPT1 = '%/%(%n%)%R%# '
PROMPT2 = '%/%(%n%)%R%# '
PROMPT3 = '>> '
HISTSIZE = '500'
DBNAME = 'SALES'
USER = 'MLEE'
HOST = '127.0.0.1'
PORT = '5480'
ENCODING = 'LATIN9'
NZ_ENCODING = 'UTF8'
LASTOID = '0'
Netezza SQL Introduction
Netezza SQL is the Netezza Structured Query Language (SQL), which runs on the Netezza
data warehouse appliance. Throughout this blog, the term SQL refers to Netezza’s
SQL implementation. Several standards relate to the definition of Netezza SQL:
�� SQL-92 (also called SQL/2) is the operative ANSI/ISO standard for relational databases today. While no vendor supports the complete SQL-92 standard, Netezza SQL conforms to all the commonly supported components of SQL-92.
�� SQL/CLI — Callable language interface (CLI), which is an addition to the SQL/92 specification
in 1995 to define required functionality for CLIs to support client-server and
other network based access models. The CLI was largely driven by ODBC, but JDBC is
also a CLI-based interface.
�� SQL:1999 (also called SQL-99) — Added regular expression matching, recursive queries, triggers, and other object-oriented features.
If you have direct access to the Netezza appliance from a command shell, or if you have UNIX clients with the Netezza CLI tools, you can run SQL commands using the nzsql command line interpreter. You can also run Netezza SQL commands using common SQL tools and applications that support ODBC, JDBC, and OLE DB data connectivity APIs. The Netezza system can support multiple concurrent connections from clients. Within a connection, Netezza supports only one active SQL activity at a time.
This blog uses the nzsql command to show query and command examples
Subscribe to:
Posts (Atom)